Functionality of ESHOP depends on user type:
-
Unregistered user - can only display a list of products and their details.
-
Registered user (not provider) - in addition to unregistered users can order products.
-
Registered user with the role of provider - in addition to registered users can create products, manage own licences and manage orders of own products.
Gallery is the only menu item available for non-registered users. It contains a list of all publicly available products. Gallery page is divided into two parts. On the left side is a tree with "Product categories" and on the right side of the web page is a list of available products.
Products filtering in the gallery
Gallery enables product filtering according to selected parameters (data provider, product type, license type, ...).
Products filtering
1. By selecting category in category tree are filtered in the list on the right side only those products that belong into that category. To view all products click on the button “Show all”.
2. Header of the products table contains three drop down menus enabling filtering products by parameters:
-
Provider - organization providing data.
-
Type - link, product file, product package.
-
Type of licence - click licence, click licence with accept, written.
-
Show non-public data - registered users can view non-public products intended only for them.

Product detail
Product detail provides a preview of the contents of the selected product (description, product variants, metadata, images, ...).
 Clicking on a particular product in the product table shows the detail page of the product.
Product detail shows product header, description, connected licence agreements, additional information, images and connected metadata.
Add to cart - all displayed product can be added to cart. This option is available only to registered users in the product detail section “Product variants”. Other users are asked to register or to log in.
Displaying additional information - in this product detail section is connected additional information (files, links).
Images - connected images can be displayed in native resolution by clicking on them.
Metadata - by clicking on connected metadata is displayed detailed metadata record in PDF format.
For all registered users is available in main menu page named "Cart". This page contains a guide for product ordering. All selected products in the shopping gallery are displayed in the cart.
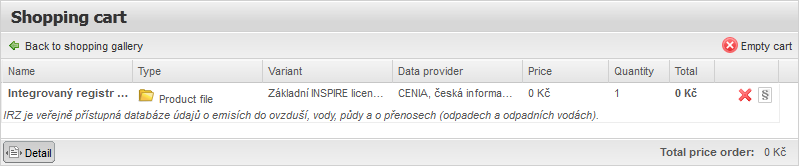
Step 1 - Shopping cart
In the first step is displayed a list of all selected products in the shopping gallery.
User has the possibility to:
-
remove product - by clicking on red cross icon is removed selected product,
-
display licence connected to the product - by clicking on an icon with section sign symbol is displayed connected licence agreement,
-
return to shopping gallery - user is directed back to shopping gallery by clicking on the button “Back to shopping gallery” in the left side of the table header,
-
empty cart - cart can by emptied by clicking on the button “Empty cart” in the right side of the table.
Click on the button “Continue” to proceed to step 2.
Step 2 - Invoice and delivery data
In the second step are displayed delivery data which are taken from user’s account.
User can select following options:
-
order for company or personal order - user has to select one option and fill in the mandatory fields (bordered in red),
-
delivery address - user can specify delivery address (optional),
-
comments to order - user can add comment to order,
Click on the button “Continue” to proceed to step 3.

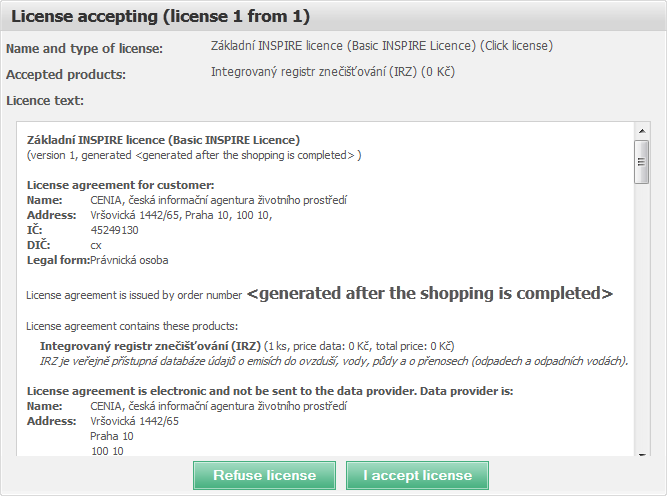
Step 3 - Accept licences
In the third step are displayed full versions of every licence agreements connected to the selected products.
User can select following options:
-
refuse licence - by clicking on the button “Refuse licence” are connected products removed from the shopping cart,
-
accept licence - user has to accept licence to order selected product, each licence connected to the selected products has to be accepted by clicking on the button “I accept licence”,
Click on the button “Continue” to proceed to step 4.
Step 4 - Summary and make order
In the last step is displayed summary of the order.
To complete the order user has to agree with the terms of e-commerce.
Order is sent for further processing by clicking on the button “Place order”.
Customer is directed to page "MY>ORDERS" after finishing the order. Order is displayed in the orders table with its status.

ESHOP offers for the registered users the option to purchase datasets or services, for registered users with the role of provider also offers the possibility to create products containing datasets or services including the possibility of setting own parameters such as licences, price,etc.
Licence
Licences are required as a necessary supplement for individual products.
For registered users with role of provider is available licence administration tool on the page "ESHOP>LICENCE". On this page is displayed table with list of available licences. Additional functionality for licence management is also available on this page. Provider can:
-
filter licences - using drop down menu user can select displayed licences (All, Only author, Global licences, licences visible to user’s groups),
-
create new licence - new licence can be created by clicking on the button “New licence”. New dialog with required items is displayed. It is necessary to fill in name, type of licence, read/write rights. A template of record of licence is created after saving the licence. All available licence templates are displayed in the licence management table,
-
edit licence - user can edit licence by clicking on the icon  in the licence management table. User can:
-
add or change licence text - by clicking on the button “Add/Change text licence”, new version of licence text is created,
-
add use type - new use type is added to the licence by clicking on the button “Add use type”,
-
delete use type - by clicking on the button  in the top right corner is deleted selected use type from the licence,
-
return to licence management table - user is returned to licence management table by clicking on the button "Back to licence list",
-
show licence - by clicking on the icon  on the right side of the licence management table is displayed actual version of selected licence,
-
delete licence - by clicking on the icon on the right side of the licence management table is selected licence deleted,
-
edit licence header - by clicking on the icon  on the right side of the licence management table is displayed dialog for licence header editing. User is alloved to edit licence header and save the changes,
-
duplicate licence - by clicking on the icon  on the right side of the licence management table is created copy of the selected licence agreement.

Products
All registered users with role of provider are allowed to add products to the e-shop.
Products management is available on the page "E-SHOP>PRODUCTS". Product management table offers to the users with role of provider following functionality:
-
product filtering - using drop down menu in the table header user can select displayed products according to:
-
Read/write rights of the product - All, Only author, products visible to user’s groups,
-
Type - Link, Product file, Produce package,
-
Status - New, Visible, Hide, Hidden by admin,
-
create new product - by clicking on the button "New product" is displayed new dialog for creating new products.
Form for the new product contains mandatory and optional items. Mandatory items are highlighted in red. User is allowed to save product after filling in all mandatory items. After saving the product a record of the product is displayed in the product management table.

-
Edit product - by clicking on the icon  on the right side of the product management table user can enter page containing product details where user can edit selected product:
-
Product header - displays product header. User can display dialog for header editing by clicking on the button "Edit".
-
Product validation - contains product validation tool. Tool displays status of every item of the product. Status is indicated by icon.  - OK,
- OK,  - optional item is missing,
  - mandatory item is missing.
-
Data - this item is available only for product type "Product file". By clicking on the button "Edit" is displayed dialog for data upload. Only ZIP or RAR files can be uploaded. User can also set access duration and maximum count of downloads. Content of uploaded file can be viewed by clicking on the button "Data viewer".
-
Category - by clicking on the button "Add to category" can user select from predefined categories used in the product gallery. Product can be added to more than one category.
-
Licence - displays a list of licences connected to the product. By clicking on the button "Add use type and licence" is displayed a dialog for connecting licence agreement. User can select use type of the product. According to the selected use type a list of available licence agreements is displayed. Next step is setting of price for data and other services (in CZK). After saving a licence agreement for product is created. Multiple licence agreements can be connected to a single product according to use type of the product. Connected licences can be deleted by icon  and edited by icon .
-
Visibility - the panel enables setting of visibility of the product. Setting can be changed by using radio buttons "Public product" and "Non-public product". Non-public product is visible only for users listed in this panel. Specific user or user type can be added to this list by buttons "Add pattern email" or "Add user type" such as Academic Institution, EU Institution,… List of users can be saved to the template for further use.
-
Metadata - in this panel can user connect link to existing metadata record stored in the geoportal by clicking on the button "Add a link to the metadata". In the displayed dialog user has to select organization and then metadata record. Multiple metadata records can be linked to a single product.
-
Images - this panel offers to the user the possibility to connect images to the product. One of the connected images can be set as a main image and will be displayed in the Gallery next to the product.
-
Additional info - user can connect additional information about the product in this panel. A file (PDF format only) or URL can be connected.
-
Publish product - product can be published by clicking on the icon  on the right side of the record. Dialog with the status of the individual parts of the product and the checkbox "I agree to the terms of e-commerce" is displayed. Unless this box is checked you cannot continue. Clicking on "Yes" button in the next dialog you can enter a comment about this publication. Then the product is published and is visible in Gallery according to the rules of visibility.
-
Hide - if the product is published an icon  "Hide" is displayed on the right side of the record. After clicking on this icon products status is changed to status before publication.
-
History - by clicking on the icon  on the right side of the record a history of the product is displayed. History of the product consists of records about product changes.
-
Product duplicate - by clicking on the icon  on the right side of the record a copy of the record is created. New product will appear as a new record in the table for product management. The name of the new product is "Name of product"+" - copy".
Orders
Geoportal offers for registered users in the role of data provider management of orders of their own products. Management of orders of created products can be found in the section "ESHOP>ORDERS".
On this page is displayed a table with list of users product orders.

Orders management offers to the owners of the products:
- Orders filtering - using the drop-down menus at the top of the orders table the user can set filters by:
- Status (New, Licence accepted, Paid, Data ready, Closed, Aborted).
- Waiting requests (Licence accept, Confirm payment, Data for download, Confirm package sent).
- View order detail - by clicking on the name of the order or on the icon
 on the right side of the record an order detail is displayed. Order detail contains bookmarks "General" with general information about order, "Order items" - list of order items with tools for order processing and "History" - with list of changes of the order.

Order items (Approval)
Users can also manage order items on the separate page "ESHOP>ORDER ITEMS".

Orders items management offers to the owners of the products:
-
Order items filtering - using the drop-down menus at the top of the orders table the user can set filters by:
-
Status (New, Licence accepted, Paid, Data ready, Closed, Aborted, Closed, Licence not accepted, Item removed) and My products.
-
Order ID - order can be searched by its ID.
-
Approve orders - contains similar tools for orders approval as described in the section "ORDERS".
Visibility templates
Geoportal offers for registered users in the role of data provider management of visibility templates of protucts.
Management of visibility templates of products can be found in the section "ESHOP>VISIBILITY TEMPLATES".
Dialog contains a form where users can define the name of the template, template for public/non-public product and in the case of non-public product data owner defines e-mail addresses or user types of users who can buy product. Template can be also shared in the user's group by setting read/write rules.

 Help - ESHOP